Two years ago, with a heavy heart, I sold my ground-floor apartment in De Pijp. While renovating it, I discovered just how much I enjoyed interior design. That marked the beginning of my transition from lawyer to designer and my adventure abroad.
After a year and a half in Spain, I'm back in the Netherlands. And last week, I bought another apartment in Amsterdam. With a garden!
How is it different from back then? This time, I’m decorating my apartment as both an interior designer and an AI trainer. And I’d love to take you through the process step by step.
Step 1 is the question students ask me most often: How do you use AI to quickly create a reliable 3D model from a floor plan?
5 Ways to Convert a Floor Plan to 3D
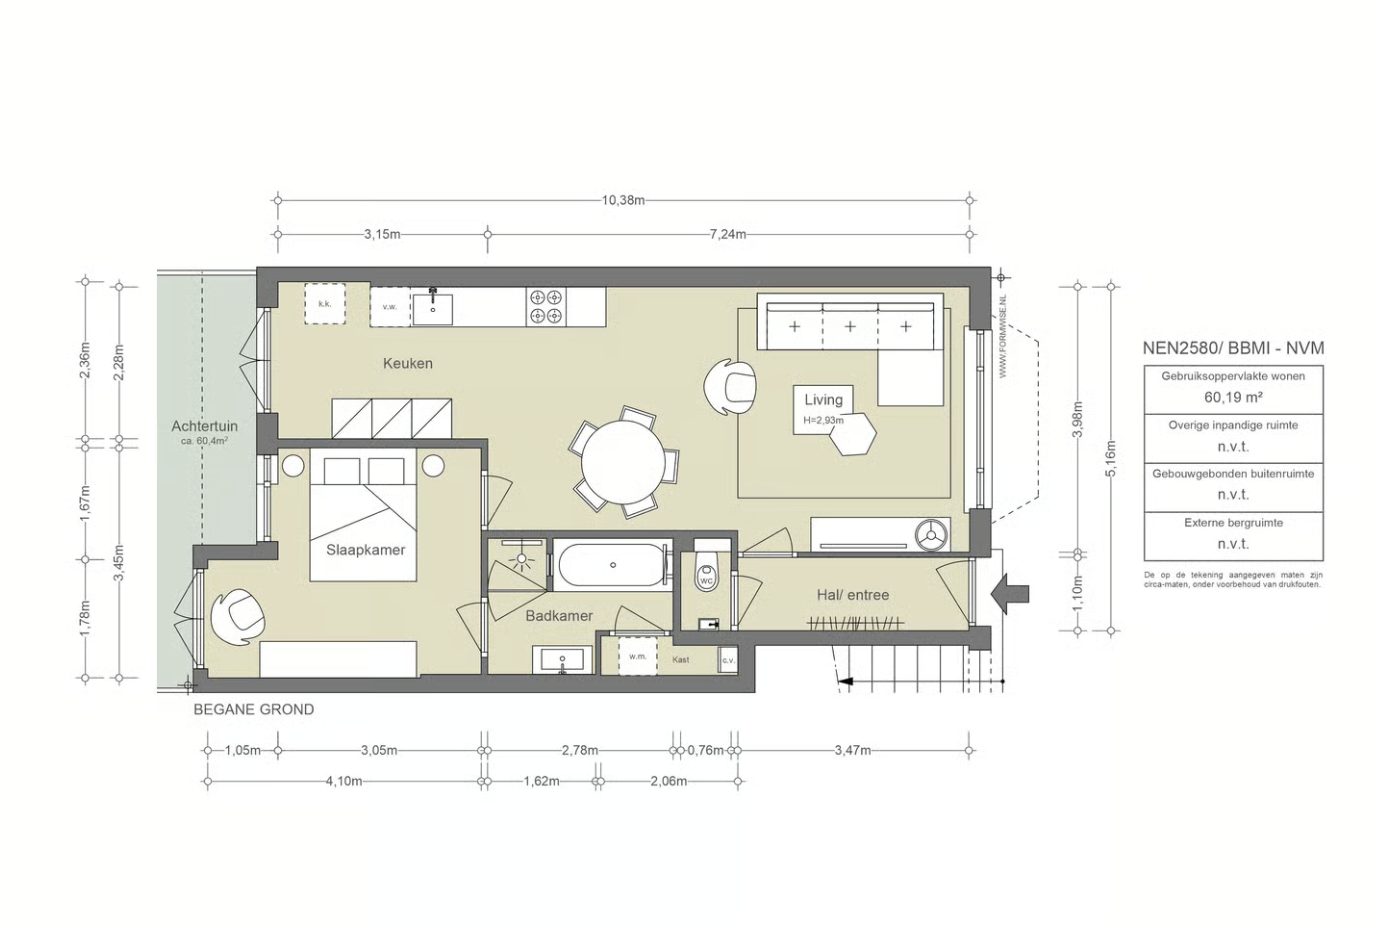
Above is the floor plan of my new apartment. It's just a screenshot from Funda, exactly as most clients submit it.
One tip before we begin: always ask for a floor plan with dimensions. Without dimensions, any 3D model is just an estimate. Below are 5 routes
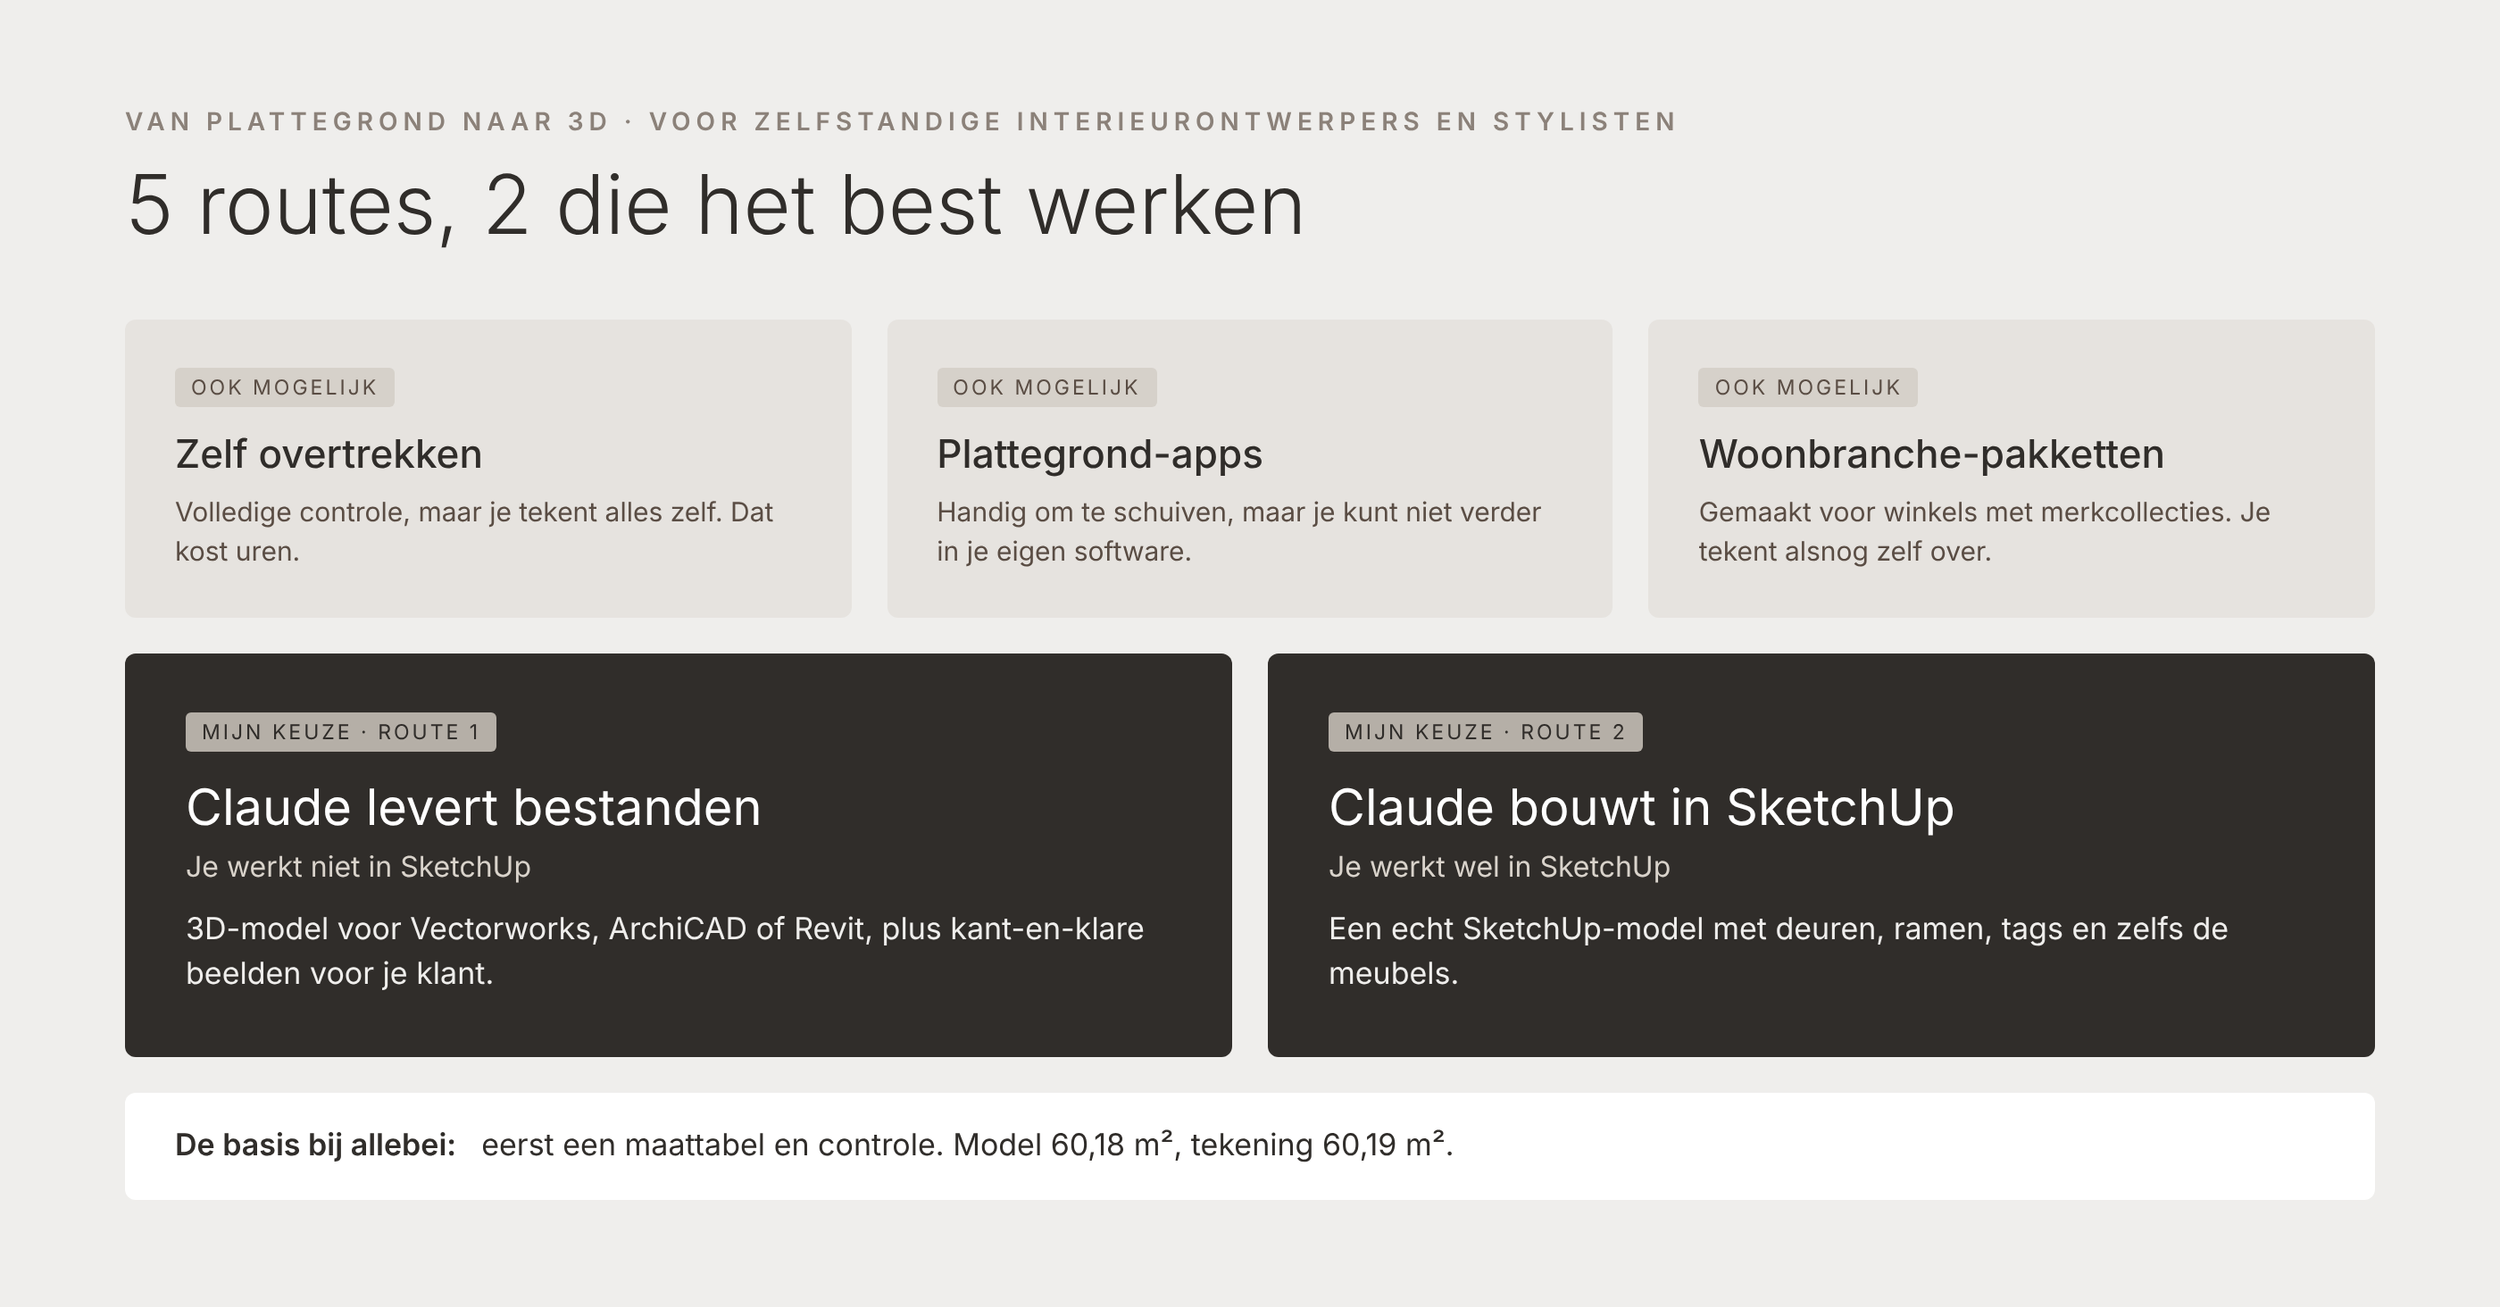
All five methods work, but not all of them are equally effective for you as a freelance designer or stylist. Tracing them yourself takes hours. A floor plan app doesn’t let you take the work further in your own software. And the packages designed for the home furnishings industry are meant for stores—and even with those, you still have to trace the plans yourself.
For the two methods I chose, Claude does the drawing, and you import the result into your own software. I've tested both of them.
Option 1: Claude builds the 3D model; you choose your software
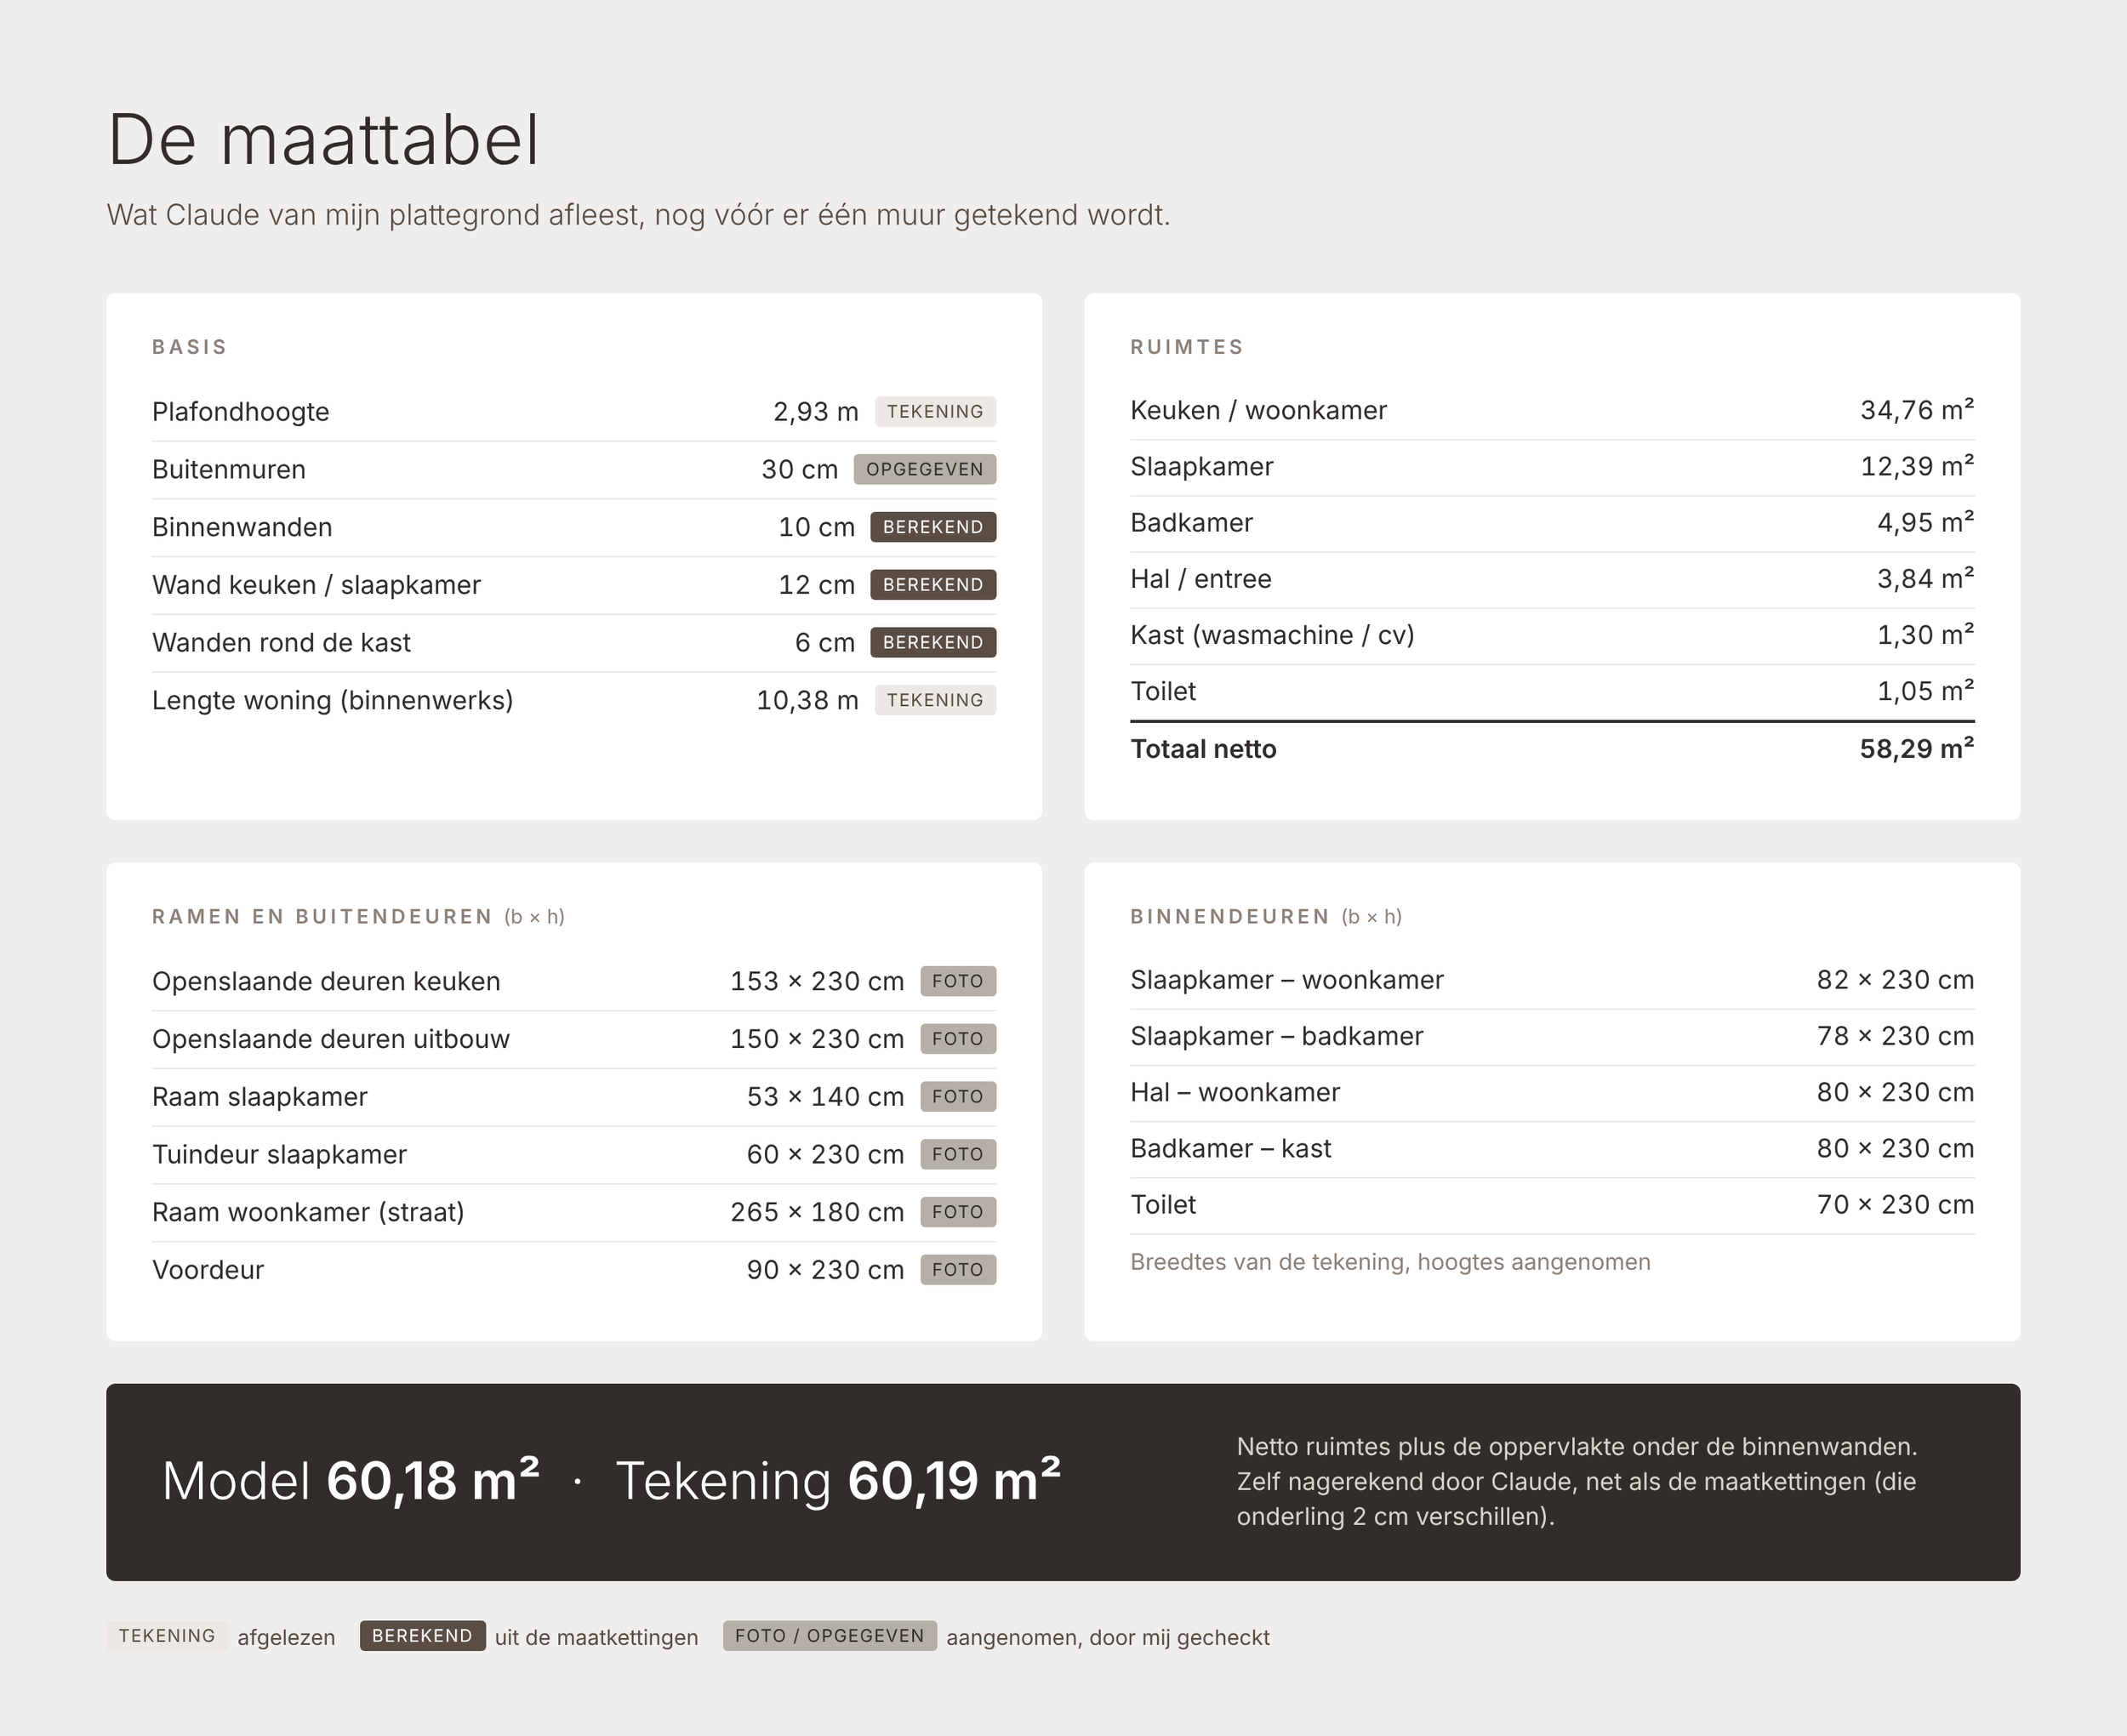
I uploaded the floor plan above and a few photos of my windows and doors in Claude. After that, I didn't ask Claude for a 3D model just yet; I asked for a dimension chart first .
That’s the most important step.
All the measurements listed, with the source for each one: taken from the drawing, calculated, or estimated. This way, you can see at a glance what you still need to measure. And you’ll immediately have a list for the contractor or kitchen supplier.
Claude measured everything on the floor plan: exterior walls, interior walls, windows, doors, and rooms. Then it double-checked its own calculations. Do the measurement chains add up? Does the area match the drawing?
The result: 60.18 m² in the model, 60.19 m² on the drawing.
And Claude pointed out some things I had gotten wrong. My interior walls are not 15 cm but 10 cm, and the ceiling is 2.93 m instead of 2.90 m.
Claude had to make assumptions about anything not shown on the drawing, such as the height of doors and windows. He neatly listed those assumptions for me so I could check them. Only then did Claude build the model.
What you'll get next
1. The 3D model in your browser: view only, no editing
You can rotate it, zoom in, lower the walls, and turn on the square meter display, then send the link to your client. You can’t move any walls yourself. If you want something different, just ask Claude (“make the bathroom door 10 cm wider”) and you’ll receive a new version.
2. The files (IFC and DXF): edit them in your own software
You can open them in Revit, Vectorworks, ArchiCAD, or SketchUp Pro. There, you can continue designing as you normally would: move walls, place furniture, and create drawings.
In short: the browser is for showing clients, while the file is for you to continue working on yourself.
3. Ready-to-use images: share them right away
Claude also creates all the images you need: a top view showing the square meters per room, a cross-section looking into the house, and a view at eye level. All without having to open any software yourself. Ideal for discussing a floor plan with your client.
▶ This is how I navigate my apartment, even without a drawing program.
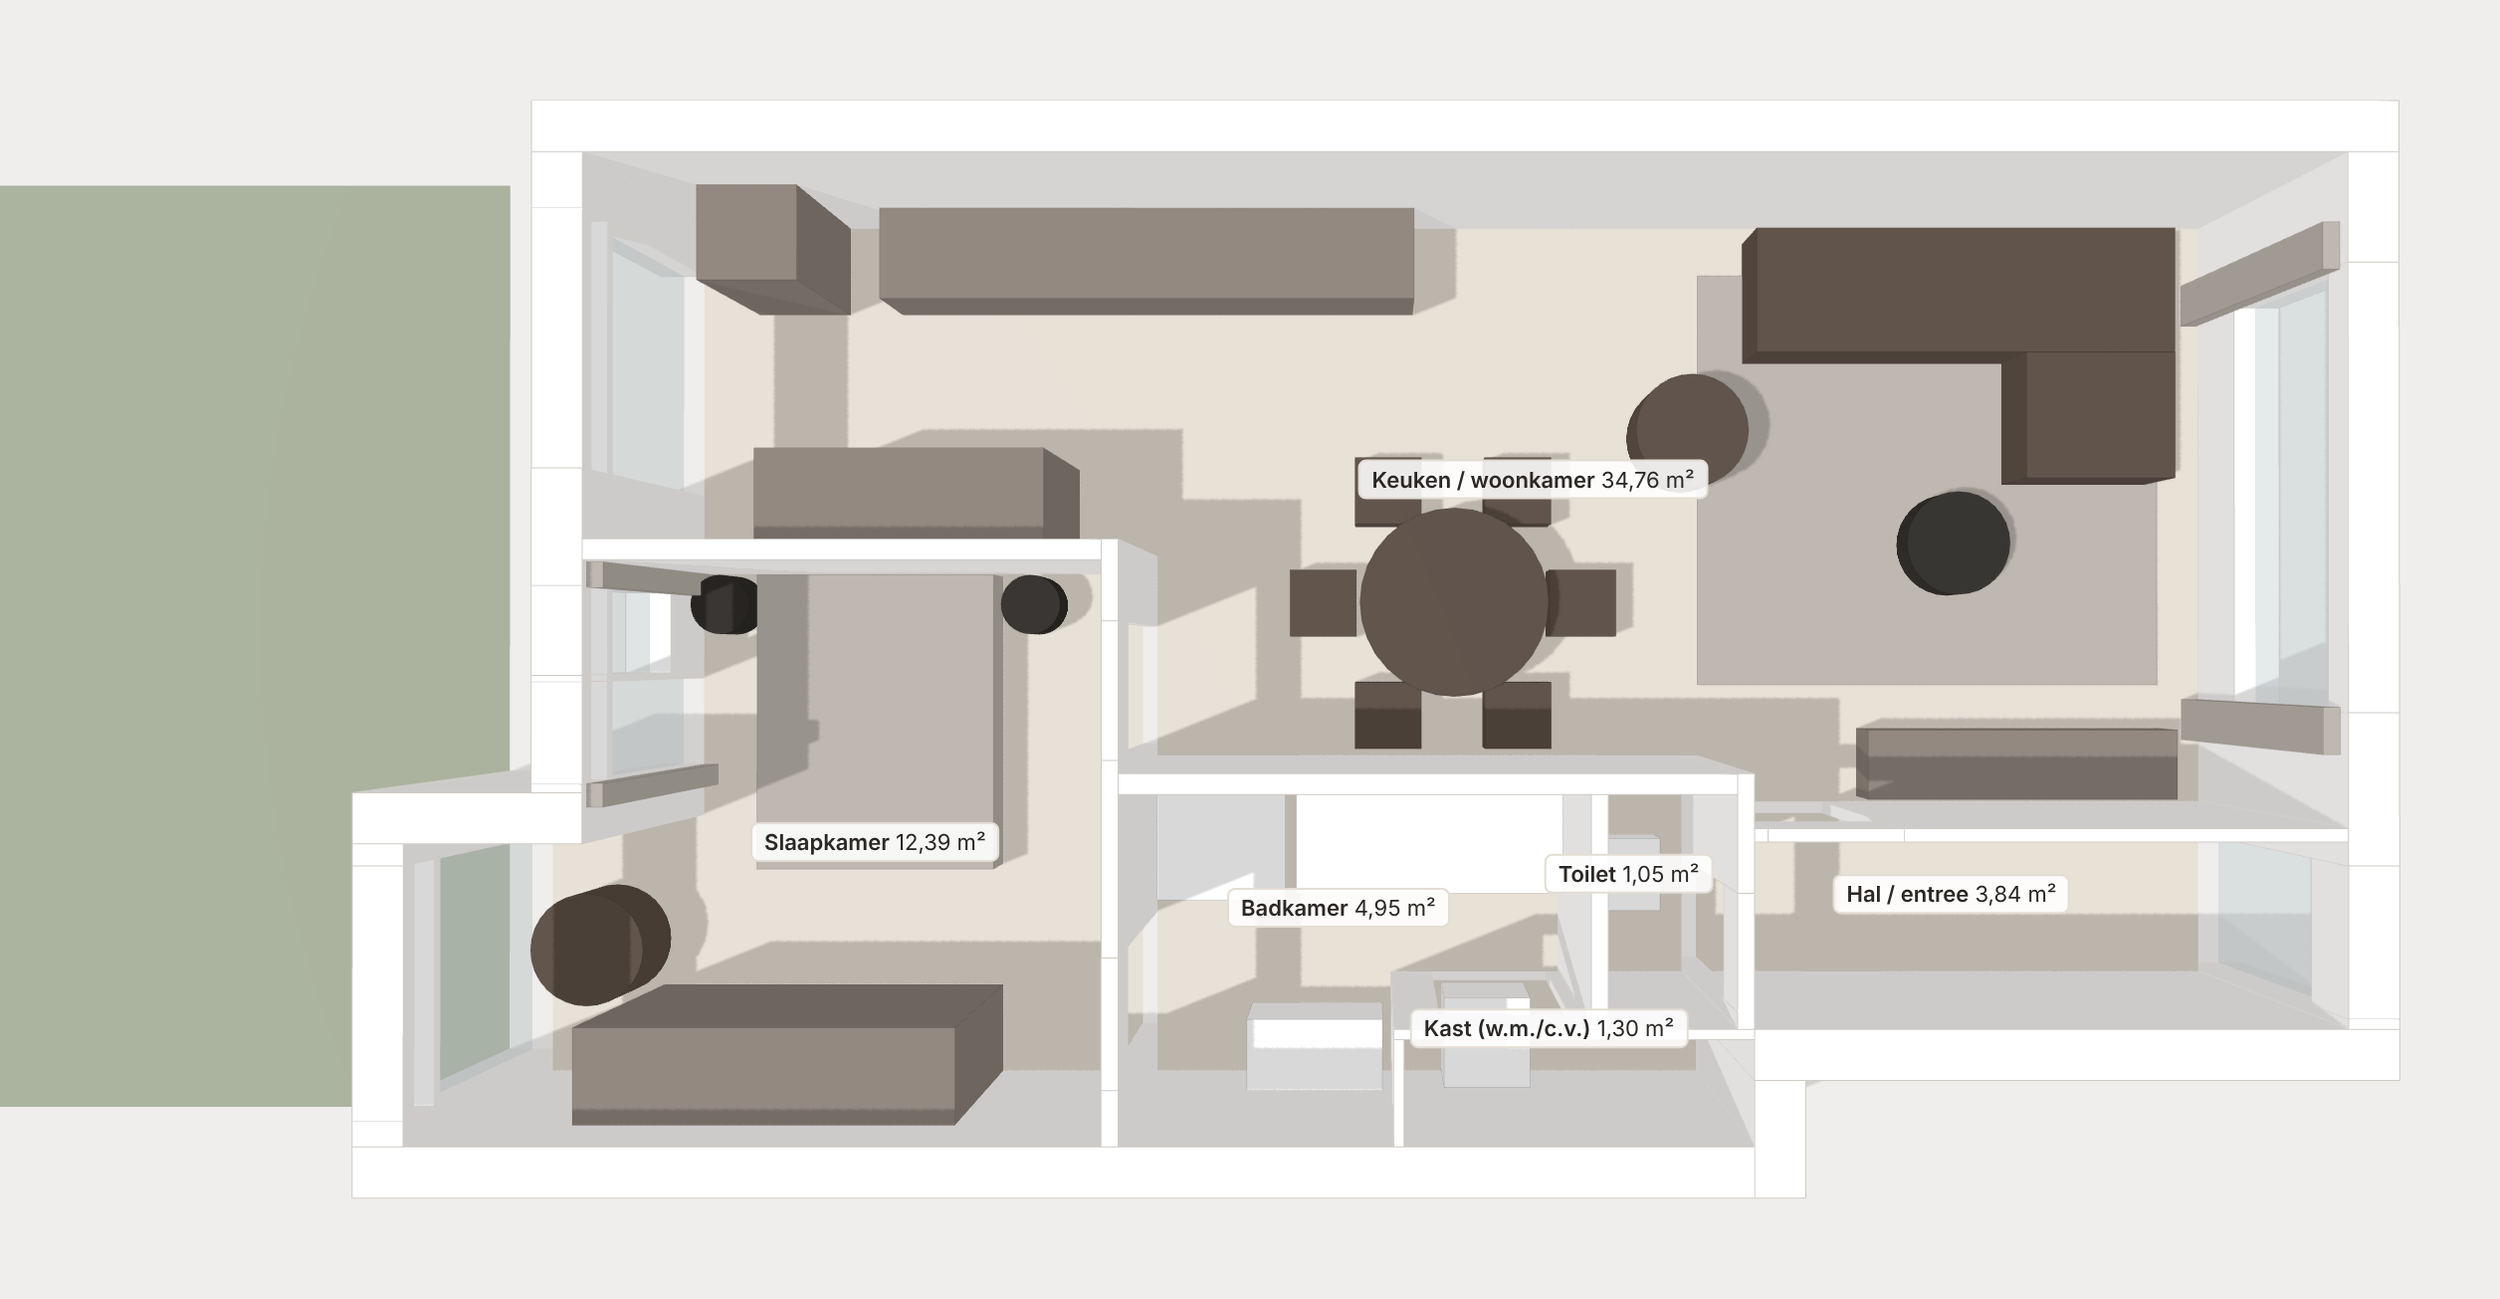
Even the furniture shown on the floor plan is included, to scale. Or you can request a model without furniture.
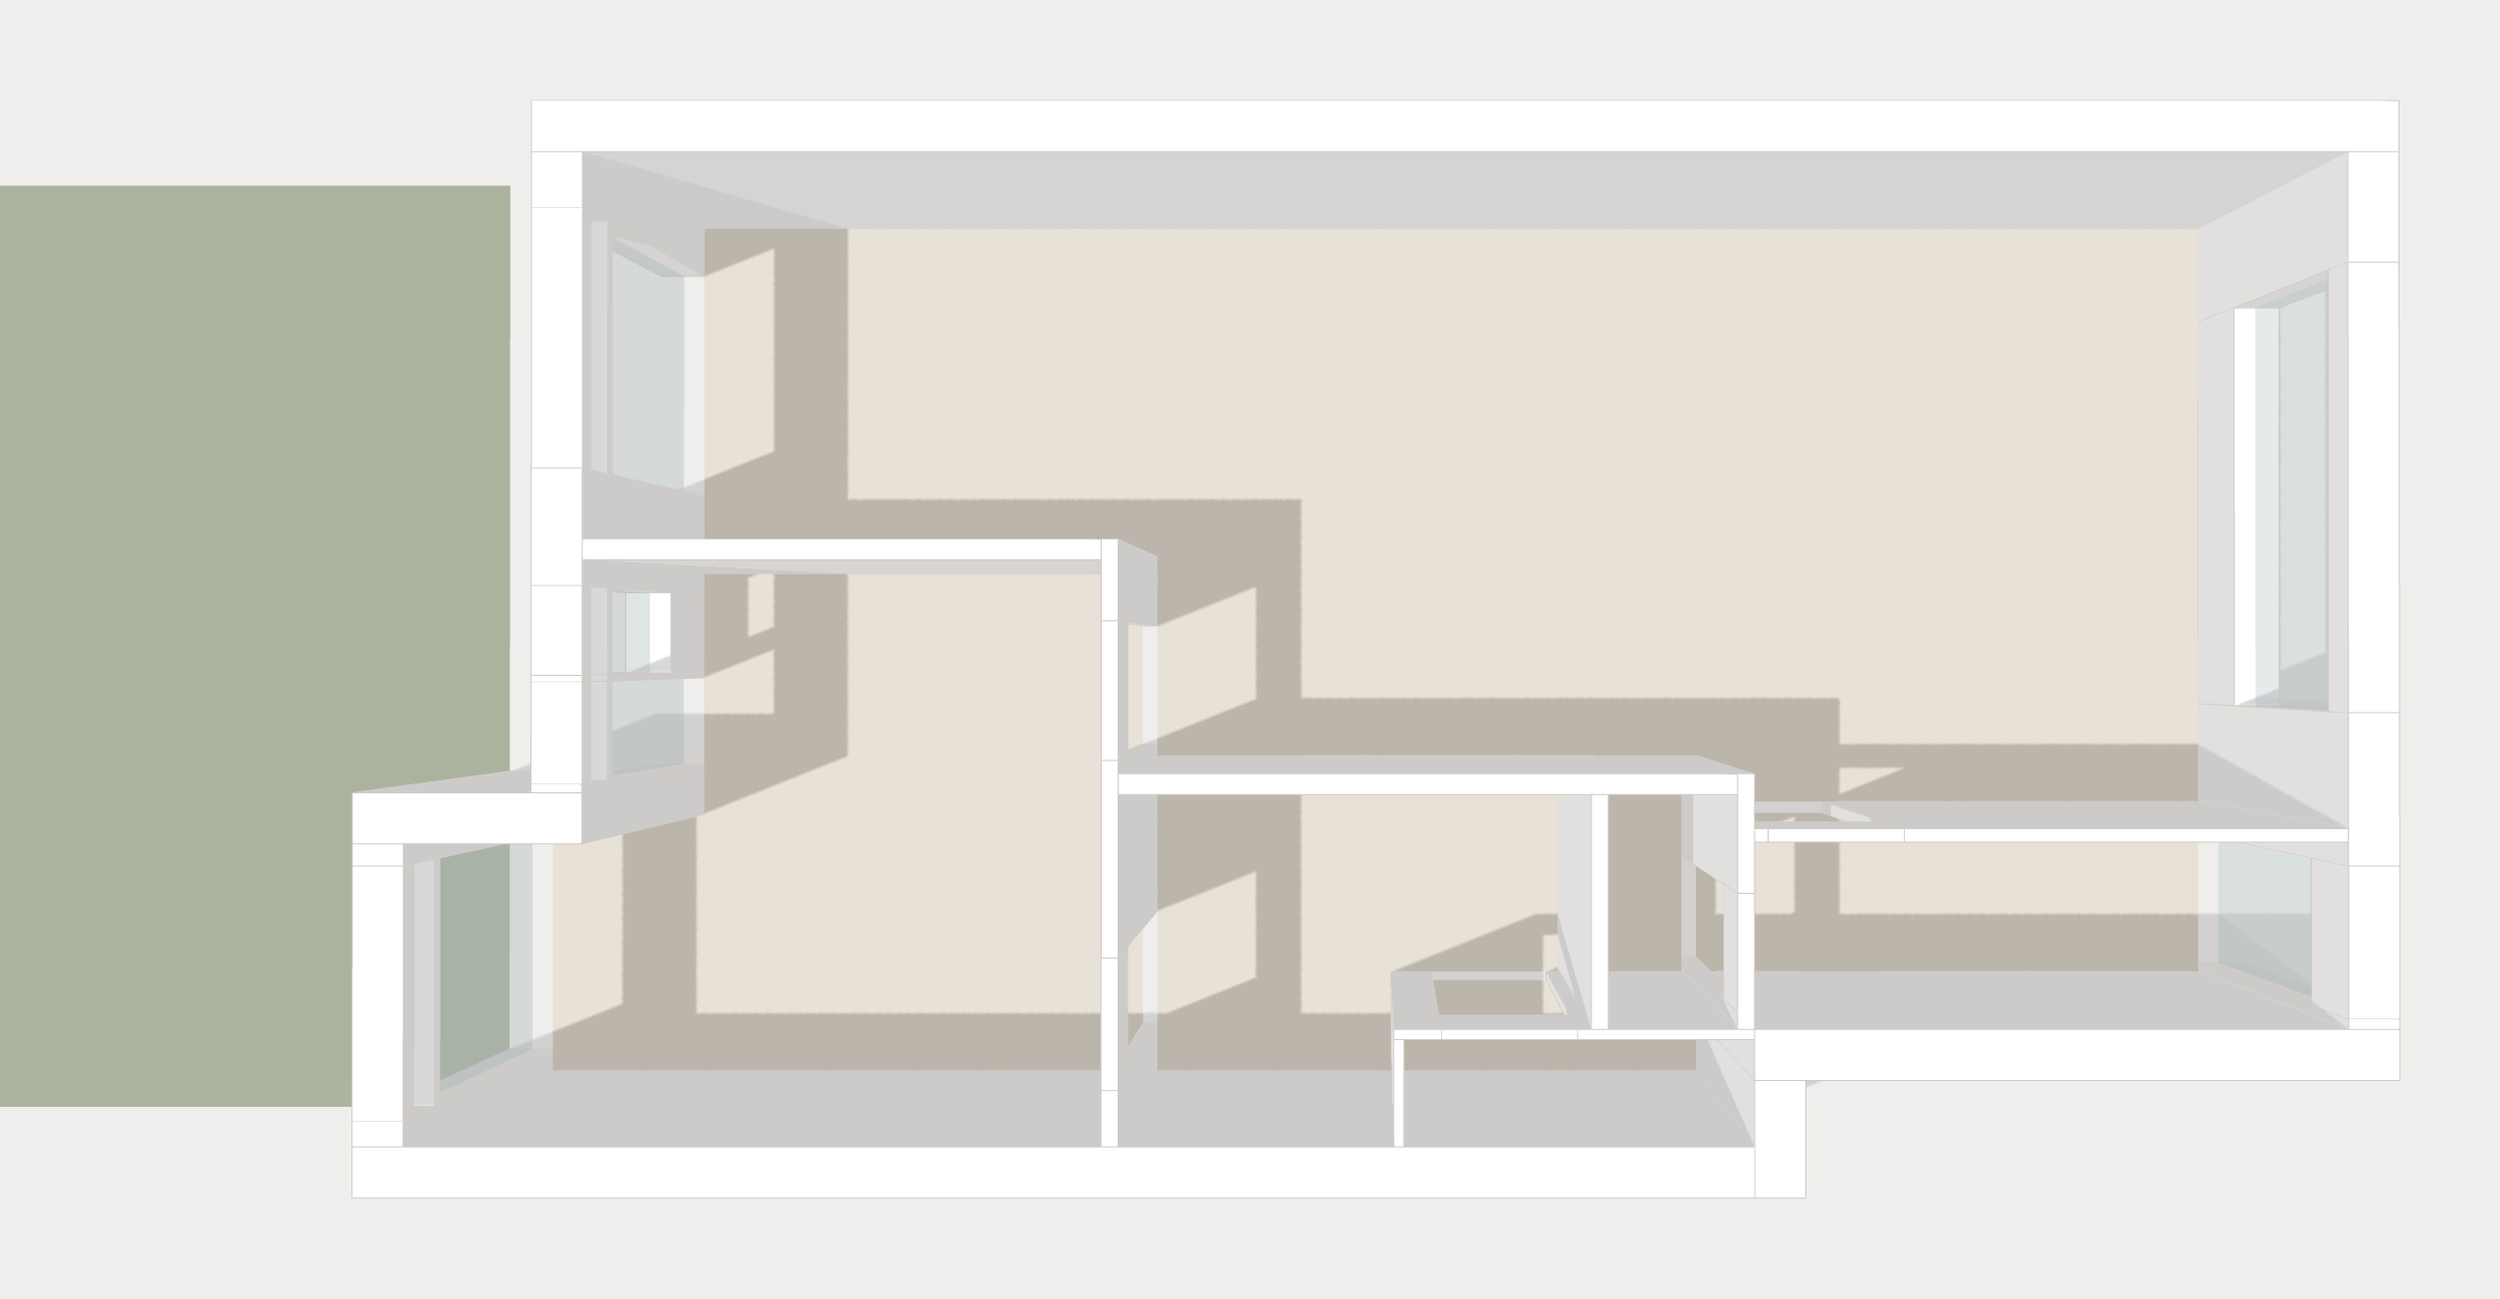
Let's be honest
These are just blocks, not atmospheric images. They're perfect for discussing a layout, but they won't exactly inspire your client's imagination. But in my next blog post, I'll explain how to turn these into stunning photorealistic images.
And importantly: always measure on-site. A model is only as good as the drawing it’s based on.
Want to try it yourself? Here’s my prompt
“I’man interior designer and want to turn this floor plan into a reliable 3D model. Follow these steps and wait for my approval after step 2:
Read all the dimension lines and enter them into a dimension table: exterior walls, interior walls (including thickness), windows and doors (position, width, height), and rooms with surface areas. Use the dimension chains to calculate wall thicknesses.
Check your work: verify the dimension chains, compare your total area with the NEN area on the drawing, and provide a list of everything you’ve assumed because it isn’t shown on the drawing.
Then build the 3D model and deliver: an interactive 3D visualization, an IFC file, and a DXF floor plan.
Data not shown on the drawing: ceiling height [..] m, exterior walls [..] cm, [description of windows and doors].”
What do you need?
I worked with Claude Opus 5.5 at the “average” thinking level, using a Pro account (about €20 per month). In Claude, go to Settings > Options and enable “Execute code and create files.” You don’t need a SketchUp integration for this tutorial.
Do you have a free account? If so, you'll be using Sonnet instead of Opus. I haven't tested that, so feel free to try it out for yourself.
Route 2: Claude builds directly in SketchUp
Do you work in SketchUp? If so, you can do it even faster. Since this spring, you’ve been able to link Claude directly to SketchUp. Claude doesn’t generate a separate file; instead, it builds the model directly as a SketchUp model.
The first step is exactly the same as in Route 1: first the size chart, then the check. That's where the accuracy comes in. Only then do you have Claude build it.
▶ The same apartment, now as a real SketchUp model.
What You'll Get
1. A real SketchUp file
. Double-click to open it. It contains walls with cut-out doors and windows, a ceiling height of 2.93 m, and one floor per room. You can start working on it right away.
2. Neatly organized
Walls, windows, and doors, as well as floors and furniture, each have their own tag. If you remove the furniture, you’ll have an empty apartment to design yourself.
3. Your Colors
Claude will also take care of the colors and lighting for you. Provide your color palette—preferably with hex codes—and Claude will apply it to the walls, floor, cabinets, furniture, and textiles.
Here's how it works
In Claude, enable the SketchUp integration via the connectors and log in with your Trimble ID.
Upload your floor plan and photos, and have Claude create the measurement chart first, using the same prompt as in Option 1.
Check the assumptions.
Then ask Claude to build the model in SketchUp.
You'll receive a download link. Open the file in SketchUp and continue working.
Would you like to make a change? Just ask Claude, and you'll get a new version. Or upload your own edited file in the chat, and Claude will continue working on it.
Good to Know
Claude can't access the file on your computer. If you want Claude to edit your version, please upload it.
If you're inactive for 30 minutes, the connection to SketchUp will time out. Upload your latest file, and Claude will continue.
Always check for yourself in SketchUp to see how it looks. Claude sets the colors, but he can't see your screen.
Want to try it yourself? Here's my prompt
“I’man interior designer and want to turn this floor plan into a reliable SketchUp model. Use the SketchUp link. Follow these steps and wait for my approval after step 2:
Read all the dimension lines and enter them into a dimension table: exterior walls, interior walls (including thickness), windows and doors (position, width, height), and rooms with surface areas. Use the dimension chains to calculate wall thicknesses.
Check your work: verify the dimension chains, compare your total area with the NEN area on the drawing, and provide a list of everything you’ve assumed because it isn’t shown on the drawing.
Then build the model in SketchUp: walls with cut-out doors and windows, one floor per room, and the furniture from the floor plan to scale.
Assign walls, windows, and doors, floors, and furniture each to their own tag.
Use these colors:
walls #FFFFFF, floor #DDD6CC, cabinets
#8B8179, furniture #5A4D44, rugs and curtains #B5AFA7, accents #302D2A, background #EFEEEC.
Deliver it as a .skp file with a download link.
Information not shown on the drawing: ceiling height [..] m, exterior walls [..] cm, [description of windows and doors].”
Of course, choose the colors you like best!
Next time: setup and rendering
The model is complete. Now the real work begins: designing the layout, choosing materials, and bringing the whole thing to life with photorealistic images. I'll show you how in the next blog post.
Can you do this yourself?
Imagine this: a client sends you a floor plan and a few photos. That same afternoon, you show them a 3D model, a new layout, and a visualization of what it will look like. That’s what you’ll learn in my AI masterclasses.
This 3D workflow is one part of that. You'll also learn:
Restyling existing spaces: turn a photo of the current situation into a completely new interior. Ideal if you’re styling and not working with custom designs.
From 2D to 3D: from floor plan to 3D model, and from furniture photo to 3D object.
Rendering, editing, and animation: from model to photorealistic image or short film.
We’re all working on our own projects—with Magnific and Claude. I’m an interior designer myself, so we work just like you do.
Would you like to learn this too? Check out the dates and locations for my upcoming Masterclasses below.
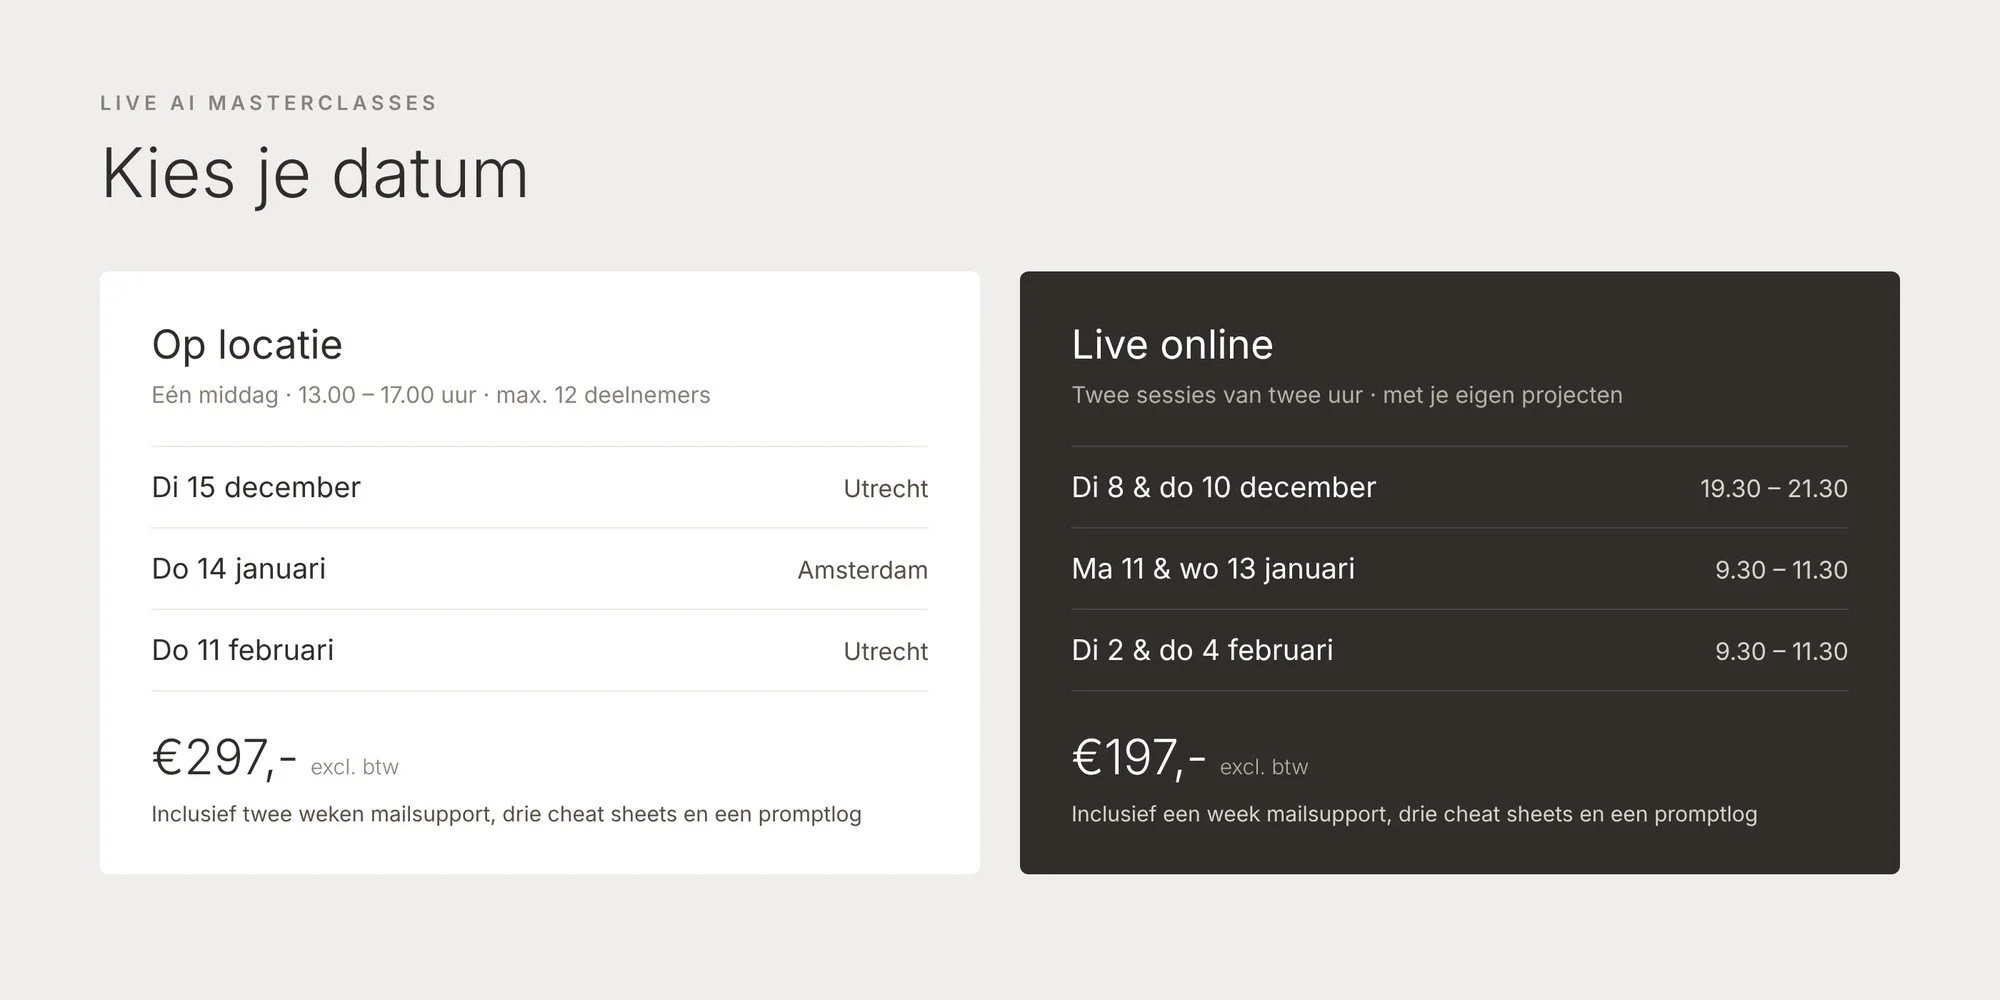
In any case, I’m really excited to share the design process for my own home with you this time and show you how AI is helping me along the way.
Do you have any questions about the masterclass, or are you unsure if it’s right for you? Feel free to send me a message. I’d be happy to help you figure it out.
See you in the next blog!
Warm regards,
Marielle